
Your system must be able to read JAVA to view the diagrams. Black starts out with 181 stones and White with 180. The total of 361 stones corresponds to the number of intersections on the standard 19x19 go board.
One player takes the black stones, the other player the white ones.
The player with the black stones, referred to as `Black', makes the first move.
The player with the white stones, referred to as `White', makes the second move. Thereafter, they alternate making their moves.
A player can play on any unoccupied intersection he wants to.
A stone does not move after being played, unless it is captured and taken off the board.
Black plays the first move in the upper right corner.
White plays 2 in the lower right corner. Black plays 3 and White plays 4.
This is a typical opening where each player has staked out a position in the two of the four corners.
Next Black approaches White 2 with 5 and White pincers 5 with 6.
Black escapes into the center with 7 and White stakes out a position in the bottom right with 8.
Next Black pincers the white stone at 6 with 9. We are going to show you how territory is formed in a game on a 9x9 board. Although go is usually played on a 19x19 board, it can also be played on a 9x9 board, or any size board from 5x5 up. Explaining the rules on a 9x9 board is convenient because the game is over quickly and the beginner can immediately grasp the flow of the game and how the score is counted. We also recommend that you play your first games on a 9x9 board and, when you have mastered the rules, start playing on the 19x19 board.
Black has stake out the right side and White has laid claim to the left side. Once you have mapped out your territory, there are two basic strategies to choose from. One is to expand your own territory while reducing your opponent's territory. The other is to invade the territory your opponent has mapped out. Black expands his territory on the lower right while preventing White from expanding his own with a move at White `a'. White must defend at 8 to block an incursion by Black into his territory on the left. Next, Black reinforces his territory on the right with 9.
He does this by first expanding his center
with 10 and 12 in Figure 3, then expanding his upper left territory with 14.
Black must defend his top right territory with 15.
The points around `a' at the top and bottom must now be decided. The same kind of sequence is next played at the bottom
from White 20 to Black 23. By playing these moves, White is able to expand his territory
while reducing Black's. It is now possible to determine the winner.
In this case, counting the score is easy.
More precisely, Black's territory is all the points marked `b' in Figure 6 and White's terriory is all the points marked `w'. If you count these points, you will find that Black has 28 points, while White has 27. Therefore, Black wins by one point. At the edge of the board a stone has only three liberties. The white stone in Diagram 8 is on the edge of the board; that is on the first line. A stone in the corner has only two liberties. The white stone in Diagram 13 is on the 1-1 point. When you capture stones in a game, you put them in your prisoner pile. Then, at the end of the game, these captured stones are placed inside your opponent's territory. This stones has only one liberty remaining at the point `a'. If Black doesn't play his next move at `a', White will play on this point and capture the black stone at 7. but White ataris again at 12. The marked stone cannot be rescued, so Black has to sacrifice it. That is, he threatens to capture them by playing at `a'. White maps out the territory on the left side, and Black expands his territory on the right side with 17 to 21. The moves from White 22 to Black 24 are the same kind of endgame sequence we saw in Figure 4 of the first game. in Figure 11. Next, the moves at White 28 and 30 each reduce Black's territory by one point. Black 31 ataris the two white stones at 26 and 30, so White must connect at 32 to save them. Finally, Black 33 reduces White's territory on the left by one point. The game ends when White blocks at 34. White places his one black prisoner (the marked black stone) inside Black's territory and Black places his two white prisoners (the two marked white stones) inside White's territory. Black has 23 points; White has 24 points. White wins by one point. but White would pursue him and the black stones would still be in atari. If Black persists with 3,he can atari the marked white stone, but White captures three stones by taking Black's last liberty with 4. Black blunders. If White extends to 1 in Diagram 23, he increases his liberties to three but Black pursues him with 2 and, after 4, White is at the end of his rope: he has no way to increase his liberties. If White plays 5, Black ataris with 6 and captures with 8. White would then turn at 3 and now the two marked black stones have only two liberties, while the white group on the right has three liberties. White captures the two marked stones with 5 and 7. Is Black 25 in Figure10 necessary? White would atari the marked black stone with 1 in Diagram 25. If Black tries to run away with 2 and 4, White pursues him with 3 and 5, forcing the black stones into the corner where they run out of liberties. White would then capture four black stones with 7.
KISEIDO
The Board
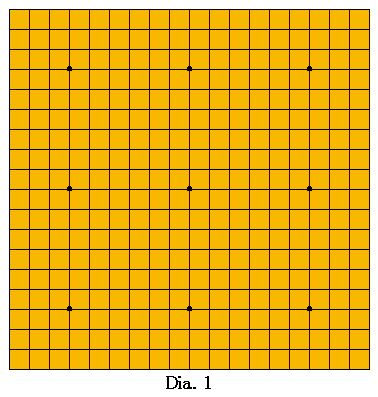
Go is usually played on a 19x19 grid, or board. Diagram 1 shows an empty board.
Notice the nine marked points. These points are usually referred to as the star points.
They serve as reference points as well as markers on which the handicap stones are placed in handicap games.
The Stones
The pieces used are black and white lens-shaped disks, called stones.
The stones are usually kept in wooden bowls next to the board.
How Go Is Played
At the beginning of the game, the board is empty.
A move is made by placing a stone on an interesection.

Diagram 2 shows the beginning of a game.
The Object of Go Is to Control Territory
The object of go is to control more territory than your opponent. At the end of the game, the player who controls the more territory wins the game.An Example Game
Figure 1, Black makes his first move on the 4-4 point, after which White makes his move.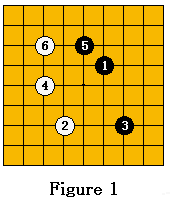
Thereafter, both sides continue to alternate in making their moves. With White 6, the territories of both sides are beginning to take shape. 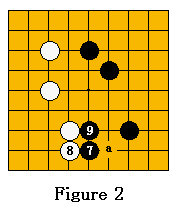
Black 7 in Figure 2 follows the first strategy: 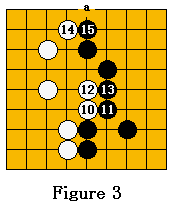
It is now White's turn to expand his territory.
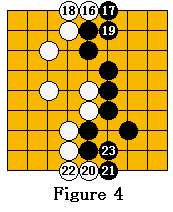
The moves from White 16 to Black 19 in Figure 4 are a common sequence.
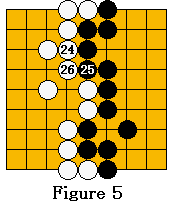
White 24 to White 26 in Figure 5 are the last moves of the game.
This was a very simple game and some of the rules did not arise. However, playing over this game will show you what Go is about.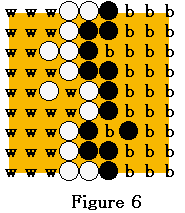
Black's territory here consists of all the vacant points he controls
on the right side, while White's territory consists of all the vacant point he controls on the left.The Rule of Capture
An important rule of Go concerns the capturing of stones. We will first show you how stones are captured, then show how this occurs in a game.Liberties
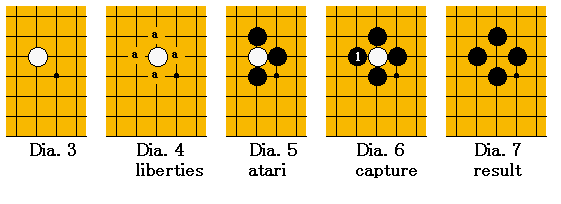
The lone white stone in Diagram 3 has four liberties.
Namely, the four points `a' in Diagram 4. If Black can occupy all four of these points, he captures the white stone.
Suppose, for example, that Black occupies three of these liberties in Diagram 5. The white stone would be in atari and Black would be able to capture it on his next move, that is with 1 in Diagram 6.
Black would then remove the white stone from the board and put it in his prisoner pile. The result of this capture is shown in Diagram 7.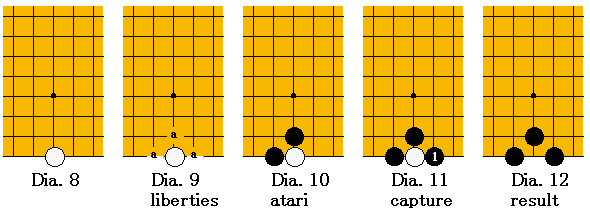
Its three liberties are at `a' in Diagram 9.
If Black occupies two of these liberties, as in Diagram 10, the white stone would be in atari.
Black captures this stone with 1 in Diagram 11.
The result of this capture is shown in Diagram 12.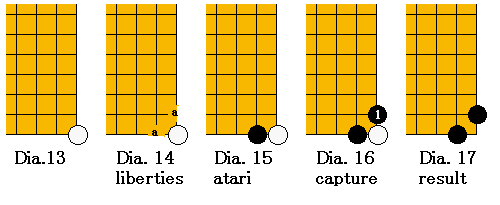
Its two liberties are at `a' in Diagram 14.
If Black occupies one of these points, as in Diagram 15, the white stone would be in atari.
Black captures this stone with 1 in Diagram 16.
The result is shown in Diagram 17.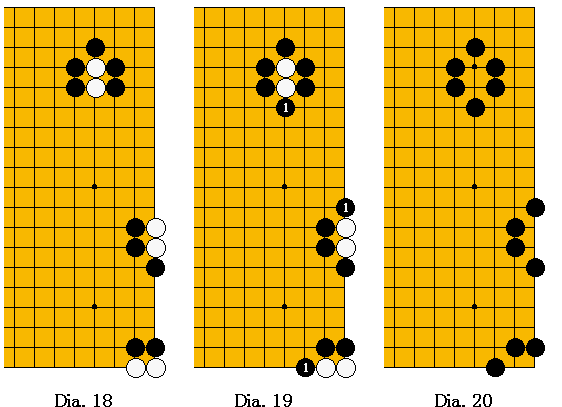
It is also possible to capture two or more stones if you occupy all their liberties. In Diagram 18, there are three positions in which two white stones are in atari.
Black captures these stones with 1 in Diagram 19.
The results are shown in Diagram 20.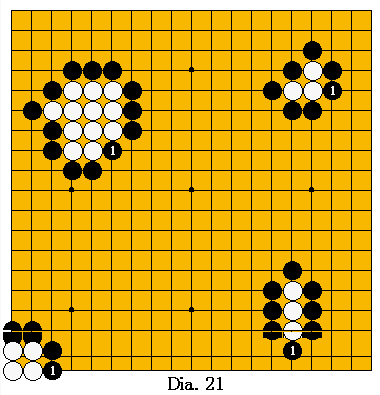
Any number of stones making up any kind of shape can be captured if all their liberties are occupied.
In Diagram 21, there are four different positions.
Black 1 captures twelve stones in the upper left, four stones in the lower left, three stones in the upper right and three stones in the lower right.
Let's look at a game to see how this actually works.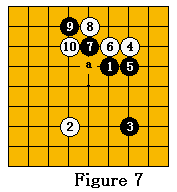
After Black plays 3 in Figure 7, White makes an invasion inside Black's sphere of influence with 4. White 10 ataris the black stone at 7. 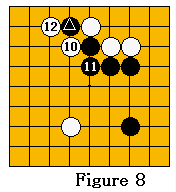
Therefore, black connects at 11 in Figure 8, 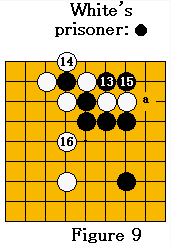
He plays his own atari with 13 in Figure 9. White then captures with 14 and Black ataris two white stones with 15. 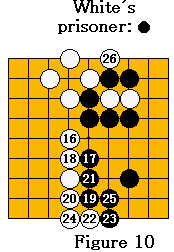
With 16 in Figure 10, 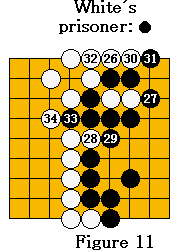
White 26 forces Black to capture two white stones with 27 . 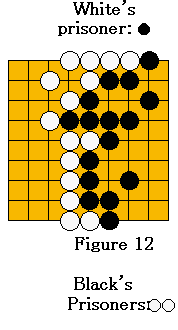
Figure 12 show what the board looks like at the end of this game.
White has one black stone in his prisoner pile, while Black has two white stones in his.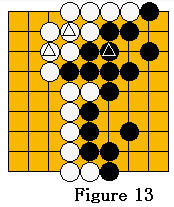
In Figure 13, each side places his prisoners in his opponent's territory.
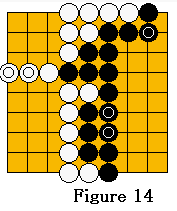
It is customary to rearrange the stones a bit to make the counting of territory simple and rapid.
In Figure 14, the three marked black stones and the two marked white stones were moved.
Calculation of the size of the territories can now be made at a glance.Questions and Answers
After White 12 in Figure 8, why didn't Black try to escape with his marked stone?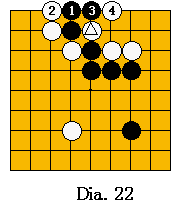
Black could try to escape by playing 1 in Diagram 22,
After Black 15 in Figure 9, it might seem as if the two White stones in atari could escape by extending to `a'. Why doesn't White try this?
The reason he doesn't try to escape is because he can't, unless 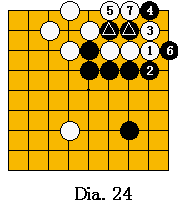
However, Black must not play 2 from the outside as in Diagram 24. 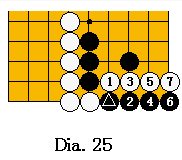
It certainly is. If Black omitted this move,
These are most of the rules of go.
There is one other rule: the ko rule,which prevents repetitive capture. The rule simply states:
If you are a beginner who wishes to learn the game of Go,
we recommend that you start with the book Go: A Complete Introduction to the Game by Cho Chikun,
from which this brief introduction was taken.
Kagawa 4-48-32
Chigasaki-shi, Kanagawa-ken
Japan 253-0082;
FAX +81-467-81-0605;
email: kiseido61@yahoo.com